

If you’re wondering how to put snow stakes in the ground, the process is simple, but proper placement can make a big difference when winter arrives. Snow stakes help mark driveways, parking lots, curbs, landscaping, and other hazards that can become hidden under snow.
The best time to install snow stakes is before the ground freezes. Most snow stakes should be placed every 8 to 12 feet along the edges of driveways and other areas you want to mark. They should also be used to identify obstacles such as fire hydrants, retaining walls, culverts, and decorative landscaping features.
Why Snow Stakes Are Important
Snow stakes provide a clear visual guide during snowstorms and low-light conditions. They help snow plow operators stay within boundaries and reduce the risk of costly property damage.
Benefits of Snow Stakes
- Mark driveway and parking lot edges
- Protect lawns and landscaping
- Improve visibility during snowstorms
- Help prevent plow damage
- Identify hidden obstacles and hazards
For homeowners and contractors alike, properly installed snow stakes can save time, money, and frustration throughout the winter season.
How Far Apart Should Snow Stakes Be?
One of the most common questions people ask is how much spacing is needed between snow stakes.
Recommended Snow Stake Spacing
- Driveways: Every 8 to 12 feet
- Curves and turns: Every 5 to 8 feet
- Parking lots: Every 10 to 15 feet
- Hazard areas: As needed for maximum visibility
Curved driveways and areas with obstacles typically require additional stakes to create a clear visual path when snow accumulates.
How to Install Snow Stakes
Step 1: Install Before the Ground Freezes
The easiest time to install snow stakes is during the fall. Frozen ground can make installation difficult and may damage stakes during insertion.
Step 2: Identify Areas to Mark
Walk your property and identify areas that may become difficult to see after snowfall.
Common locations include:
- Driveway edges
- Sidewalks
- Parking lots
- Retaining walls
- Fire hydrants
- Mailboxes
- Decorative landscaping
- Culverts and drainage ditches
Step 3: Position Stakes Correctly
Place stakes approximately 2 to 6 inches back from the edge of the area being marked.
This allows snow plows to follow the markers while reducing the chance of the stakes interfering with equipment.
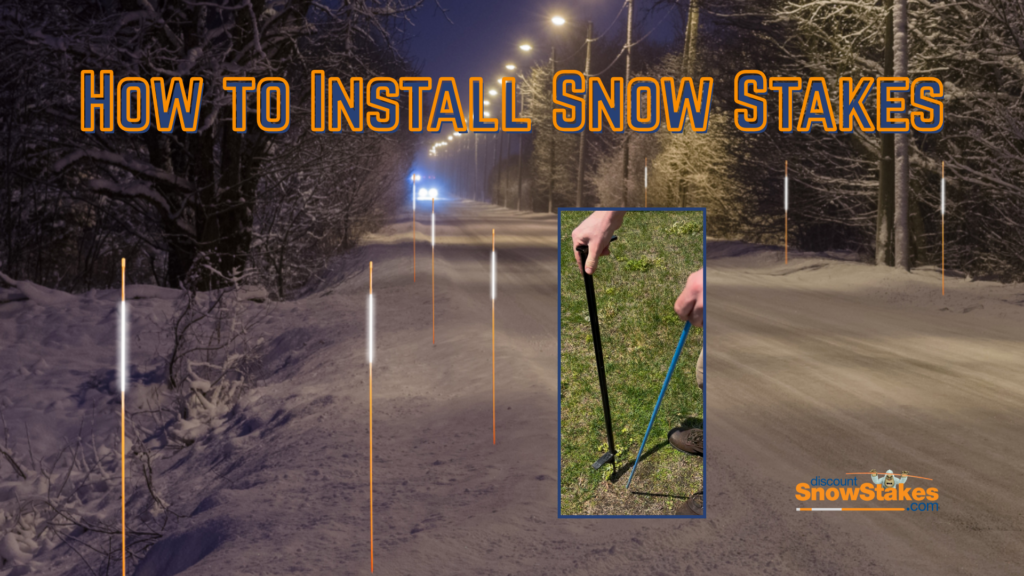
Step 4: Insert Stakes Securely
Instillation depends on preference. Some will install snow stakes by hitting them into the ground with a rubber mallet. We have also heard using a metal rod or rebar to create a hole in the ground for the stake to to into is useful.
We have also created a snow stake install tool to assist in the process. It creates a hole in the ground, and then can be turned over and used as a slide tube to hit the top of the stake to secure it into the ground even farther. We have a [YouTube] video showing off our tool as well.
Leave enough stake above ground to remain visible after snow accumulation. Areas with heavy snowfall often benefit from taller stakes ranging from 48 to 72 inches.
Step 5: Check Visibility
Walk around the property and make sure the stakes are easy to see from multiple angles.
If visibility is limited, add additional markers in problem areas.
Key Snow Stake Placement Tips
Use Highly Visible Stakes
Bright colors such as orange, yellow, or lime green are easier to see during snowstorms. Stakes with reflective tape provide even greater visibility during nighttime operations.
Mark Hazards Clearly
Snow can hide many obstacles that become expensive problems when struck by a plow.
Consider marking:
- Landscape boulders
- Decorative borders
- Utility boxes
- Fire hydrants
- Drainage structures
- Retaining walls
Add Extra Stakes on Curves
Straight sections require fewer markers, but curved driveways should have additional stakes to create a clear visual guide.
Consider Snowfall Amounts
Areas that receive significant snowfall often require taller stakes to remain visible throughout the season.
Choosing the Right Snow Stakes
Fiberglass snow stakes are one of the most popular options because they are durable, flexible, and weather-resistant. Unlike wood stakes, they won’t rot or splinter. Unlike metal stakes, they won’t permanently bend after impact.
Many contractors prefer fiberglass snow stakes with reflective tape because they provide excellent visibility while standing up to harsh winter conditions.
Prepare Before the First Snowfall
Knowing how to put snow stakes in the ground is an important part of winter preparation. By installing stakes before the ground freezes, spacing them properly, and marking hazards throughout your property, you can improve safety and help prevent costly damage all season long.
Whether you’re a homeowner marking a driveway or a contractor preparing multiple properties, properly placed snow stakes provide a simple and effective solution for winter visibility.
Quality Matters
Looking for top quality snow stakes for your snow removal needs? Visit DiscountSnowStakes.com or reach out to us by calling (866) 938-0922 or emailing [email protected] and we’ll help you get premium stakes for every need.
To put snow stakes in the ground, install them before the ground freezes, spacing them every 8 to 12 feet along driveway edges. Position stakes 2 to 6 inches from the edge of the surface being marked, insert them securely into the ground, and use bright, highly visible stakes to mark hazards and improve winter visibility.